July 5th 2023
Displaying your full-sized YouTube thumbnail or a custom OG image in a Twitter card
In days past, links to YouTube videos on Twitter used to show a nice full-sized thumbnail image. You could specify the poster image you wanted over in YouTube and it would appear along with an embedded video player.
These days, links to YouTube videos have been downgraded to only show a small image card which is frustrating for anyone wanting to share their videos on Twitter with a visible and inviting call to action to watch them. In an effort to make their videos stand out and attract clicks again, some have taken to attaching a thumbnail images directly to their tweets which, while making them visually appealing, get in the way of click-throughs as people find themselves just seeing a larger version of the image rather than viewing the video.
We can fix this with a crafty use of Netlify's Edge Functions.

June 26th 2023
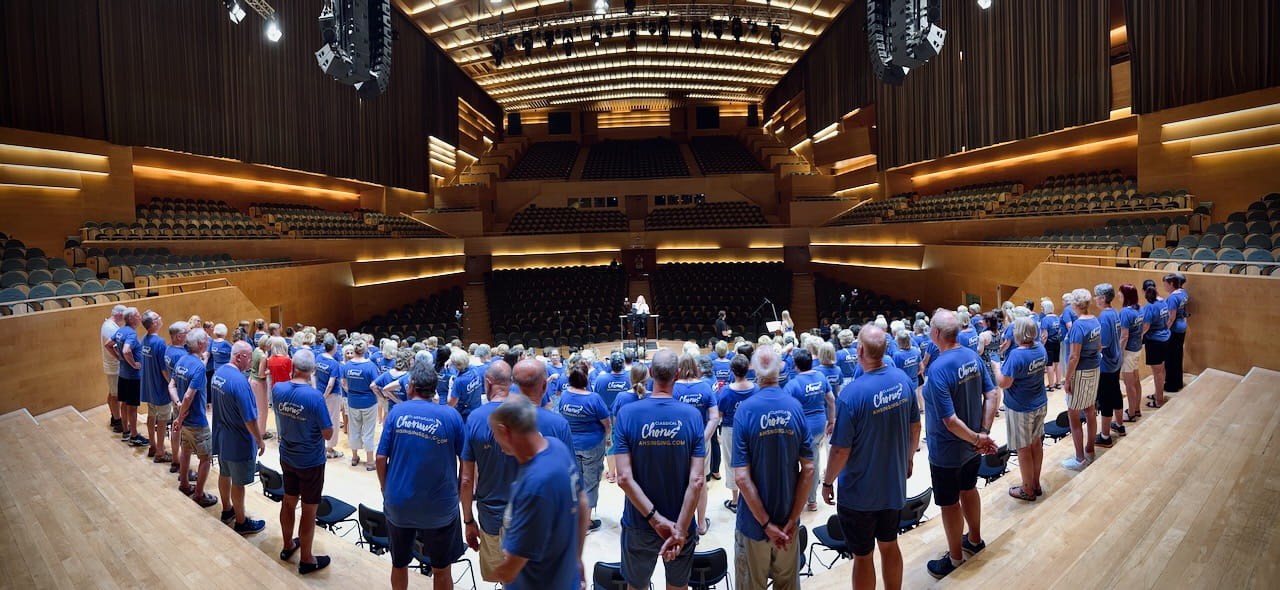
On song - Finding my lost voice
I love music. All sorts of music. And particularly the sound of voices. Many voices harmonising and resonating together gives me goosebumps. It's magical. But ever since one moment in my early teens, I've felt that it wasn't something I could ever do. I've been silent.
However, after more than 30 years of bashfully hiding my singing voice, and feeling embarrassed of it even in the privacy of driving in the car on my own, or with shampoo in my eyes in the shower, I've finally found my voice. And I'm going to gush about that for a few paragraphs if you don't mind.
January 9th 2023
Host your own Twitter archive and make it searchable with Edge functions
Recently I made the decision to reclaim my content from Twitter and host all of my tweets as part of my own website. Many other people made a similar call once Twitter’s future began to look so uncertain and unhealthy. Truth be told, I’d intended to do this for some time because it’s nice to keep control of your own content.
I also wanted to ensure that my future posts on Mastodon, the platform du jour, would accumulate as part of the same searchable and addressable archive over time. Giving everything a URL on my own domain that I could be ensure would live on for as long as I wanted.
December 12th 2022
Alias your mastodon account to your own domain with Netlify redirect
September 26th 2022
What I learned from automating millions of web site deploys
January 6th 2020
Prerendering is the key to a tasty Jamstack
January 2nd 2020
Eleventail - A helper for TailwindCSS and Eleventy
November 25th 2019
MC tips for a conference or a meetup
September 13th 2019
Netlify pro tip - Using Split Testing to power private beta releases
August 29th 2019
Rethinking Deployment - on TalkScript
August 19th 2019
Power up Gatsby sites with A/B testing on Netlify
July 16th 2019
Reflecting on London’s first JAMstack conference
July 1st 2019
Tips for rolling your own lazy loading
January 4th 2019
findthat.at - A URL shortener powered by Netlify
December 12th 2018
Keeping Sass simple and speedy on Eleventy
October 18th 2018
Adding search to a JAMstack site
October 16th 2018
Contentful and GitHub help make JAMstack_Conf a reality
September 27th 2018
The 10 talks and many highlights of Vue London
June 14th 2018
Off with their heads ! The rise of the modern CMS
April 29th 2018
Comedy in the Crown goes pro
April 10th 2018
Webserverless
November 22nd 2017
Smashing Magazine moves to a JAMstack architecture
November 17th 2017
Joining Netlify
November 10th 2017
TTFN R/GA
March 27th 2017
Keeping a Jamstack Site Feeling Fresh With Recent Tweets
August 1st 2016
Isomorphic Rendering on the JAMstack
February 1st 2016
Progressive Enhancement Design Smackdown
December 2nd 2014
Better Than Perfect
November 5th 2014
The Shapes of Web Views
July 22nd 2014
Adding a Static Comments System to My Jekyll Build
January 6th 2014
Too Funky Didnt Read
November 16th 2013
Using a Wiimote for Presentations
November 14th 2013
On Hiring Developers
June 18th 2013
London Content Strategy Meetup
June 5th 2013
Oakleys Moto Diet
May 29th 2013
Data Viz at Digital Dumbo
May 9th 2013
Pathing the Gimmicky Cowpaths
May 7th 2013
Talking at Jsday Verona
April 22nd 2013
Oakleys Monster Page of Baubles
April 21st 2013
Reflecting on Txjs
April 12th 2013
Excess CMS and Stink at Txjs
March 28th 2013
Smelly CMS at HTML5DevConf
November 29th 2012
Simplicity and performance with static files
October 9th 2012
I can smell your CMS at Fronteers 2012
July 25th 2012
Bootstrapping front-end development with Yeoman
July 24th 2012
Sketch.js adds convenient canvas rendering
November 18th 2011
Visiting BBC Online at Salford
November 13th 2011
Reflecting on Full Frontal 2011
November 3rd 2011
Excessive Enhancement at Full Frontal
November 2nd 2011
Joining R/GA
November 1st 2011
Time to move on from The Team
September 19th 2011
Value in a happy hack day
September 9th 2011
Expectations of web development at agencies
August 9th 2011
Social media did not cause the London riots
May 27th 2011
Getting started with Node at AsyncJS
May 9th 2011
Developing a side project
September 10th 2010
The next generation stack. Is NodeJS ready to go mainstream?
July 27th 2010
Hitched
February 15th 2010
Nodejs I just have to use it for something
August 10th 2009
In defense of IE6
August 7th 2009
Using Quicksilver to control Last.fm
July 27th 2009
Flash v Web. Behind enemy lines
April 23rd 2009
Moving on from Osmosoft
March 13th 2009
Leveraging Jquery and Jquery Plugins in TiddlyWiki
February 15th 2009
Mashing up flickr in the client with jQuery
January 5th 2009
Unobtrusify your Javascript
August 27th 2008
Enthusiasm and Good Food at Tiddlyparis
August 27th 2008
Announcing JigglyWiki. A TiddlyWiki experiment with jQuery
July 16th 2008
Get your Task Management wiki
May 19th 2008
Nba updates on twitter
April 18th 2008
Jsspec Bundle for Textmate Helps With Writing
March 28th 2008
How to create and distribute lovely screencasts
January 7th 2008
Observing Twitter Behaviours
December 17th 2007
Osmosoft return from LeWeb3 intact
November 4th 2007